
Graduation Cake Pops: 5 Cute and Easy Treats to Celebrate
Graduation Cake Pops – Cute, Festive & Easy to Make Treats are the perfect way to celebrate this significant milestone in style. These delightful sweets save time and add a festive touch to your graduation party. Have you ever wondered how to make treats that are not only fun to eat but also visually appealing? Imagine the burst of colors, the rich flavors, and the laughter of friends and family as they enjoy these sweet bites together.
As you take your first bite, the soft cake inside melts in your mouth, and the sweet candy coating adds a delightful crunch. The vibrant colors of the candy melts and the playful sprinkles make these cake pops irresistible. Their cute designs will bring joy to your celebration, creating memorable moments that you’ll cherish forever.
Moreover, these cake pops are incredibly versatile! You can customize them with various cake flavors, frosting combinations, and decorations to suit your graduation theme. Imagine cake pops adorned with your school colors or decorated to reflect your field of study. The possibilities are endless, making them a family favorite for any festive occasion.
Now, let’s talk about the health benefits of the ingredients we’re using. While cake pops are primarily a treat, understanding the nutritional aspects can provide a well-rounded perspective.
The primary ingredient, cake mix, can be made with whole grains, offering some dietary fiber. When you choose a cake mix that includes whole wheat flour, you’re adding a bit of fiber to your dessert. Fiber is essential for digestive health and can help you feel fuller, preventing overindulgence.
Another vital component is frosting. If you opt for homemade frosting, you can control the sugar content and even incorporate healthier fats like avocado or Greek yogurt. This way, you can provide a treat that feels indulgent while still being mindful of nutritional balance. For instance, using Greek yogurt can add protein while reducing calories.
The candy melts used for coating can be rich in antioxidants, especially if you choose dark chocolate varieties. Antioxidants help combat oxidative stress in your body, promoting overall health.
Additionally, using sprinkles adds a fun touch, but they also come in various options, including those made with natural colors and fewer artificial ingredients. This allows you to cater to different dietary preferences and make the treats more wholesome.
Surprisingly, did you know that cake pops can be a great source of joy and creativity? Engaging in baking and decorating can enhance your mood and reduce stress, making these treats not just a delicious dessert but also a therapeutic activity.
So, why choose this specific recipe for graduation cake pops? This version stands out because it combines simplicity with creativity. Unlike other recipes that may require advanced baking skills, this one is beginner-friendly, making it accessible for everyone. You don’t need to be a professional baker to create these festive treats.
Moreover, the unique aspect of this recipe is its adaptability. You can easily modify the cake flavor, frosting, and decorations to match your graduation theme, ensuring that your treats are not just tasty but also a reflection of your personality and achievements. Whether you’re celebrating with family, friends, or classmates, these cake pops are sure to impress and satisfy.
In summary, this recipe is designed for everyone, from novice bakers to experienced ones looking for a quick and fun treat. It works wonders for graduation parties, making it an excellent choice for special occasions where you want to leave a lasting impression.
Here’s a quick summary of the recipe: Prep time is approximately 30 minutes, with another 30 minutes for cooling and decorating. This recipe yields about 24 cake pops, making it perfect for a gathering. It’s suitable for all skill levels and ideal for weeknight baking or a last-minute addition to your graduation celebration.
What are Graduation Cake Pops?
Graduation Cake Pops are bite-sized treats made from cake crumbs mixed with frosting, shaped into balls, and coated in candy melts. They are typically placed on lollipop sticks, making them easy to hold and eat. These festive treats are often decorated to reflect graduation themes, such as school colors or caps and diplomas.
Why You Will Love This Recipe
- Simple ingredients: This recipe uses common pantry staples, making it budget-friendly.
- Customizable: You can easily change flavors and decorations to match your graduation theme.
- Kid-friendly: Making cake pops can be a fun activity for kids, allowing them to participate in celebrations.
- Portable: Cake pops are easy to transport, making them ideal for parties or gatherings.
- Visually appealing: The colorful coating and decorations make them a hit at any celebration.
Ingredients You Need
- 1 box of cake mix (any flavor): The base of your cake pops; choose your favorite flavor.
- 1 cup of frosting (store-bought or homemade): Adds moisture and binds the cake crumbs.
- 12 oz of candy melts (in colors of your choice): Provides a colorful, sweet coating.
- Lollipop sticks: Essential for holding the cake pops; choose sturdy ones for best results.
- Sprinkles (optional for decoration): Adds fun and flair to your cake pops.
- Styrofoam block or cake pop stand: Used for drying the cake pops upright.
How to Make Graduation Cake Pops Step by Step
- Prepare the cake mix according to the package instructions and bake in a 9×13 inch pan. Let it cool completely.
- Once the cake has cooled, crumble it into a large bowl until fine crumbs form.
- Add the frosting to the cake crumbs and mix until well combined. The mixture should be moist enough to hold its shape.
- Using your hands, scoop and roll the mixture into small balls (about 1 inch in diameter) and place them on a baking sheet lined with parchment paper.
- Chill the cake balls in the refrigerator for about 30 minutes to firm up.
- While the cake balls chill, melt the candy melts according to package instructions until smooth.
- Dip the end of each lollipop stick into the melted candy and insert it into the center of each cake ball. This helps secure the stick in place.
- Once the sticks are inserted, dip each cake pop into the melted candy, ensuring it’s fully coated. Allow excess candy to drip off.
- Decorate with sprinkles while the coating is still wet, then place the pops upright in the Styrofoam block to set.
- Let the candy coating harden completely before serving.
Pro Tip: Ensure the cake is fully cooled before crumbling; this prevents melting the frosting.
Expert Tips for Best Results
- Use a cake mix that doesn’t require additional ingredients for simplicity.
- Experiment with different frosting flavors for unique taste combinations.
- Chill the cake balls longer if they are difficult to handle.
- Work with small batches of cake pops to keep the melted candy at the right temperature.
- For a smoother finish, tap the cake pop gently after dipping to remove excess coating.
- Store any leftovers in an airtight container to maintain freshness.
Variations and Substitutions
- Gluten-free option: Use gluten-free cake mix and frosting to cater to dietary restrictions.
- Chocolate cake pops: Substitute chocolate cake mix for a richer flavor.
- Fruit-flavored pops: Use strawberry or lemon cake mix for a refreshing twist.
- Seasonal decorations: Customize toppings for holidays, like red and green for Christmas or pastel for Easter.
How to Serve and Store
Serve Graduation Cake Pops on a decorative platter or cake pop stand for a festive display. They pair well with drinks like punch or lemonade, perfect for celebrating with friends and family.
For storage, keep the cake pops in the fridge for up to one week. If you want to freeze them, wrap each pop individually in plastic wrap and store in an airtight container for up to three months. When ready to enjoy, let them thaw in the fridge.
Reheating is not necessary; simply enjoy them cold or at room temperature for the best flavor and texture.
Frequently Asked Questions
Can I make cake pops in advance?
Yes, you can prepare and freeze cake pops up to three months in advance.
What flavors can I use for cake pops?
You can use any flavor of cake mix, including chocolate, vanilla, or red velvet.
How do I prevent the candy coating from cracking?
Ensure the cake pops are chilled before dipping and avoid overheating the candy melts.
Can I use chocolate instead of candy melts?
Yes, you can use melted chocolate, but it may require tempering for a smooth finish.
Are cake pops suitable for dietary restrictions?
Absolutely! You can make gluten-free or dairy-free versions with the right ingredients.
How do I make cake pops without a stand?
You can place them upright in a cup or container filled with rice to hold them in place.
In conclusion, these Graduation Cake Pops – Cute, Festive & Easy to Make Treats are a delightful addition to any graduation celebration. They not only provide a fun and creative baking experience but also offer the joy of sharing delicious treats with loved ones. With the ability to customize flavors and designs, you’re sure to create memorable moments. Try this recipe today and leave a comment below!
Print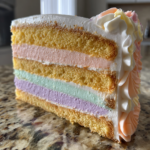
Graduation Cake Pops: 5 Cute and Easy Treats to Celebrate
Description
Celebrate graduation with these adorable cake pops! They are easy to make and perfect for any graduation party. With a fun design and delicious flavor, these treats are sure to be a hit.
Ingredients
- 1 box of cake mix (any flavor)
- 1 cup of frosting (store-bought or homemade)
- 12 oz of candy melts (in colors of your choice)
- Lollipop sticks
- Sprinkles (optional for decoration)
- Styrofoam block or cake pop stand for drying
Instructions
- Bake the cake according to package instructions. Let it cool completely.
- Crumble the cooled cake into a large bowl until fine crumbs form.
- Add the frosting to the cake crumbs and mix until fully combined. The mixture should hold together when rolled into a ball.
- Roll the mixture into 1-inch balls and place them on a baking sheet lined with parchment paper.
- Insert a lollipop stick into each cake ball. Freeze for about 30 minutes until firm.
- Melt the candy melts according to package instructions in a microwave-safe bowl.
- Dip each cake pop into the melted candy melts, ensuring it’s fully coated. Allow excess to drip off.
- If desired, sprinkle decorations on top before the coating hardens.
- Place the cake pops upright in a Styrofoam block or cake pop stand to dry completely.
Notes
- Feel free to mix different cake flavors and colors of candy melts for a fun variety.
- Use chocolate or white candy melts for a classic look.
- Store cake pops in an airtight container at room temperature for up to a week.
Nutrition
- Serving Size: 1 cake pop
- Calories: 150
- Sugar: 10
- Sodium: 50
- Fat: 7
- Saturated Fat: 3
- Carbohydrates: 20
- Fiber: 0
- Protein: 2
- Cholesterol: 0
Keywords: graduation cake pops, easy cake pops, festive treats, cake pop recipe, party desserts