Ah, spring! It’s that magical time when everything comes to life again, and I can’t help but feel inspired to bake. The bright colors, the fragrant flowers, and the promise of warm weather just make me want to fill my kitchen with delightful scents. And you know what dessert perfectly captures that joyful essence? My beloved *spring cake*! It’s light, fluffy, and bursting with the freshness of the season, making it an absolute must for any celebration!
I’ve whipped up this cake for countless special occasions—birthdays, baby showers, and even just a sunny Sunday brunch with friends. The way it rises in the oven, turning golden and fragrant, fills my heart with joy. My favorite part is how easy it is to make! With just a handful of simple ingredients, you can create something that looks and tastes like you spent all day in the kitchen. Trust me, everyone will be asking for the recipe!
So, whether you’re hosting a spring gathering or just want a slice of sunshine with your afternoon tea, this *spring cake* is sure to brighten your day. Let’s jump into the ingredients that make this cake so special!
Ingredients List
Here’s what you’ll need to whip up this delightful *spring cake*. I always make sure to gather everything before starting so I can dive right into the baking process without any interruptions. Let’s get right to it!
- 2 cups all-purpose flour, sifted
- 1 cup granulated sugar
- 1/2 cup unsalted butter, softened to room temperature
- 1 cup milk, at room temperature
- 3 large eggs, at room temperature
- 2 teaspoons baking powder
- 1 teaspoon vanilla extract
- 1/4 teaspoon salt
- Fresh berries, washed and dried (for topping)
- Powdered sugar, for dusting
Make sure your butter and eggs are at room temperature; it really helps everything blend together beautifully. And don’t skip on the fresh berries— they’re the crowning glory of this cake! Now that we’ve got everything ready, let’s move on to how to prepare this heavenly dessert.
How to Prepare Instructions
Now, let’s get down to the nitty-gritty of making this *spring cake*! I promise it’s a straightforward process, but I’ll walk you through each step to make sure you feel like a pro. So, roll up your sleeves and let’s get cooking!
Preheat and Prepare
First things first, you’ll want to preheat your oven to 350°F (175°C). This is super important because it ensures your cake bakes evenly and rises beautifully. While that’s heating up, grab a 9-inch round cake pan. Go ahead and grease it with a little unsalted butter or cooking spray, making sure to cover the bottom and sides well. Then, sprinkle a bit of flour in there, tapping it around to coat the surface. This will help the cake slide right out later. Trust me, nobody wants a cake stuck to the pan!
Creaming the Butter and Sugar
In a large mixing bowl, toss in your softened butter and granulated sugar. Now, here’s where the magic begins! Using a hand mixer or a wooden spoon, cream them together until the mixture looks light and fluffy, about 2-3 minutes. You’ll see it turn a pale yellow color, and that’s when you know you’re on the right track. This step is crucial because it incorporates air into the batter, giving your cake that lovely light texture!
Mixing the Wet Ingredients
Next, it’s time to add the eggs! Crack them in one at a time, mixing well after each addition. This helps to ensure everything blends together smoothly. Don’t forget to add the vanilla extract after the eggs! It adds such a delightful flavor to the cake. Just keep mixing until everything is well combined and creamy—about another minute should do the trick.
Combining Dry Ingredients
Now, let’s bring in the dry ingredients! In a separate bowl, whisk together your sifted flour, baking powder, and salt until they’re perfectly combined. Here’s a little pro tip: when you add the dry mixture to your wet mixture, do it in batches. Start by adding about a third of the dry ingredients, then pour in half the milk, mixing gently until just combined. Repeat this, alternating the dry and wet ingredients, and finish with the dry. This technique prevents overmixing, which can lead to a dense cake. We want light and fluffy, remember?
Baking the Cake
Now it’s time to pour your batter into the prepared cake pan. Smooth the top with a spatula for an even bake. Pop that beauty into your preheated oven and let it bake for about 25-30 minutes. You’ll know it’s done when a toothpick inserted in the center comes out clean or with just a few moist crumbs. It’s so satisfying to watch it rise and turn golden brown!
Cooling and Decorating
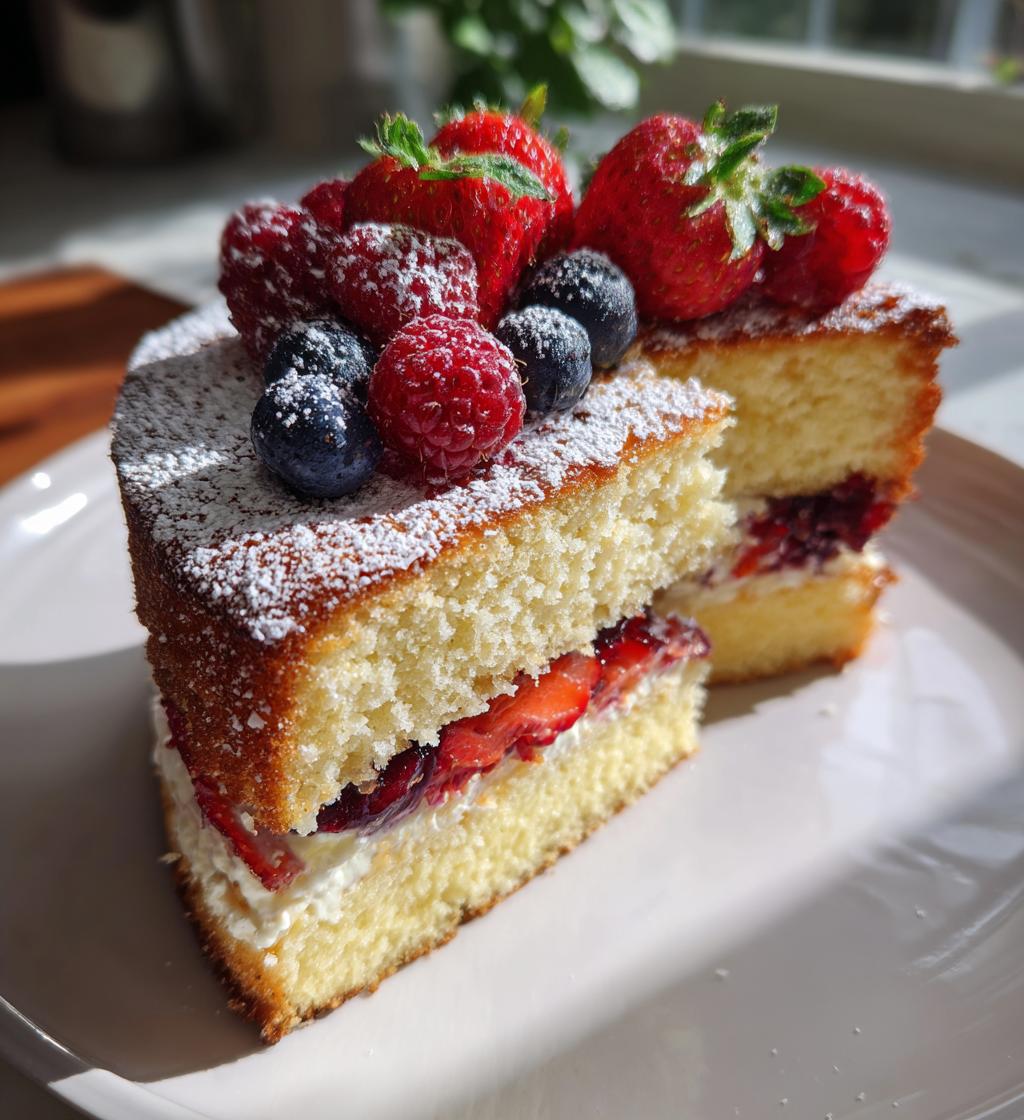
Once your cake is baked to perfection, take it out of the oven and allow it to cool in the pan for about 10 minutes. This makes it easier to remove without breaking. After that, gently run a knife around the edges and flip it out onto a wire rack to cool completely. Now for the fun part! Once it’s fully cooled, top it with those fresh berries you prepared earlier and give it a light dusting of powdered sugar. Wow! It’s like spring on a plate!
Why You’ll Love This Recipe
This *spring cake* is truly a delight for so many reasons! Here are just a few that make it a favorite in my kitchen:
- Light and Fluffy: The texture is simply irresistible! It’s like a cloud of sweetness that melts in your mouth.
- Easy to Prepare: With just a handful of ingredients and straightforward steps, you’ll feel like a baking superstar in no time!
- Perfect for Celebrations: This cake is ideal for any gathering, whether it’s a birthday, a brunch, or just a sunny afternoon with friends.
- Customizable: You can easily add your favorite flavors, like lemon zest or almond extract, to make it your own!
- Fresh and Fruity: Topped with fresh berries, it’s a beautiful and vibrant addition to any dessert table.
- Make-Ahead Friendly: You can bake it a day in advance, making your party planning that much easier!
Seriously, once you try this *spring cake*, you’ll understand why I keep coming back to it season after season!
Tips for Success
Now that you’re all set to bake this *spring cake*, let me share some of my best tips to ensure it turns out perfectly every time. These little nuggets of wisdom have saved me more than once, and I can’t wait for you to benefit from them, too!
Room Temperature Ingredients Are Key
Make sure your butter, eggs, and milk are at room temperature before you start mixing. This helps them blend together more smoothly, resulting in a better texture for your cake. If you forget to take them out ahead of time, no worries! Just place cold eggs in warm water for about 10 minutes, and that’ll do the trick.
Don’t Overmix!
This is super important—once you combine the wet and dry ingredients, mix just until everything is incorporated. Overmixing can lead to a dense cake instead of the light, airy texture we’re aiming for. Just a few gentle folds should do the job!
Flavor Variations
If you want to switch things up, consider adding some lemon or orange zest to the batter for a bright, citrusy kick. I also love a splash of almond extract in place of vanilla for a unique twist. Experiment with what you love!
Keep an Eye on Baking Time
Every oven is a little different, so keep an eye on your cake as it bakes. Check for doneness a few minutes before the suggested time. Remember, it’s better to take it out a little early than to risk overbaking. You want that perfect balance of moistness!
Storage Tips
If you have leftovers (which I doubt, but just in case!), store them in an airtight container at room temperature for up to three days. You can also refrigerate it if you prefer, but let it come to room temperature before serving to keep that delightful texture.
Presentation Matters
When it comes to topping your cake, feel free to get creative! Along with fresh berries, you can drizzle it with a simple glaze made from powdered sugar and a bit of milk or lemon juice. Or try whipped cream for an extra indulgent touch. Presentation is everything, and this cake is sure to impress!
With these tips in hand, you’re well on your way to mastering the art of the *spring cake*. I can’t wait for you to experience the joy it brings to your table!
Nutritional Information
Now, let’s take a moment to talk about the nutritional side of this delightful *spring cake*. It’s always nice to know what you’re enjoying, right? Here’s a rough estimate of the nutritional values per slice, based on the ingredients we’ve used:
- Calories: 250
- Fat: 10g
- Saturated Fat: 6g
- Trans Fat: 0g
- Cholesterol: 50mg
- Sodium: 150mg
- Carbohydrates: 35g
- Fiber: 1g
- Sugar: 15g
- Protein: 4g
Keep in mind, these values can vary a bit depending on the specific brands of ingredients you use or any modifications you make to the recipe. But overall, this *spring cake* is a delightful treat that you can feel good about enjoying. So go ahead and indulge a little—after all, it’s made with love!
FAQ Section
Q1. Can I use whole wheat flour instead of all-purpose flour for this *spring cake*?
Absolutely! You can substitute whole wheat flour for all-purpose flour, but I recommend using a blend of both. This keeps the cake light while adding a bit of that wholesome flavor. Just remember, whole wheat flour can make the cake denser, so you might want to add a touch more milk to keep it moist.
Q2. How can I make this *spring cake* gluten-free?
To make this cake gluten-free, use a 1:1 gluten-free flour blend that includes xanthan gum. Many blends work beautifully in cakes, and this will help achieve that fluffy texture we all love. Just be sure to check the package instructions for any adjustments needed!
Q3. Can I add other fruits besides berries on top?
Definitely! While fresh berries are a lovely choice, you can get creative with your toppings. Sliced peaches, chopped kiwi, or even a drizzle of lemon curd would be fabulous. Just remember to balance the sweetness of the cake with the tartness of the fruit for a delightful flavor explosion!
Q4. How do I store leftover *spring cake*?
If you happen to have leftovers (which is rare in my house!), store them in an airtight container at room temperature for up to three days. If you prefer, you can refrigerate it, but be sure to let it come back to room temperature for the best taste and texture. You can also freeze slices for up to a month. Just wrap them tightly in plastic wrap and place them in a freezer-safe bag!
Q5. Can I make this cake ahead of time for a party?
Absolutely! The *spring cake* actually tastes even better the next day as the flavors develop. You can bake it a day in advance and store it covered at room temperature. Just wait to add your fresh berries and powdered sugar until you’re ready to serve for that stunning presentation!

Spring Cake: 5 Secrets to a Joyful and Fluffy Delight
- Total Time: 45 minutes
- Yield: 8 servings 1x
- Diet: Vegetarian
Description
A light and fluffy cake perfect for spring celebrations.
Ingredients
- 2 cups all-purpose flour
- 1 cup sugar
- 1/2 cup unsalted butter, softened
- 1 cup milk
- 3 large eggs
- 2 teaspoons baking powder
- 1 teaspoon vanilla extract
- 1/4 teaspoon salt
- Fresh berries for topping
- Powdered sugar for dusting
Instructions
- Preheat your oven to 350°F (175°C).
- Grease and flour a 9-inch round cake pan.
- In a bowl, cream together the butter and sugar until light and fluffy.
- Add the eggs one at a time, mixing well after each addition.
- Stir in the vanilla extract.
- In another bowl, combine flour, baking powder, and salt.
- Gradually add the dry ingredients to the wet mixture, alternating with milk.
- Pour the batter into the prepared pan.
- Bake for 25-30 minutes or until a toothpick comes out clean.
- Let the cake cool before removing it from the pan.
- Top with fresh berries and dust with powdered sugar before serving.
Notes
- Store leftovers in an airtight container.
- This cake can be made a day in advance.
- Try adding lemon zest for extra flavor.
- Prep Time: 15 minutes
- Cook Time: 30 minutes
- Category: Dessert
- Method: Baking
- Cuisine: American
Nutrition
- Serving Size: 1 slice
- Calories: 250
- Sugar: 15g
- Sodium: 150mg
- Fat: 10g
- Saturated Fat: 6g
- Unsaturated Fat: 3g
- Trans Fat: 0g
- Carbohydrates: 35g
- Fiber: 1g
- Protein: 4g
- Cholesterol: 50mg
Keywords: spring cake