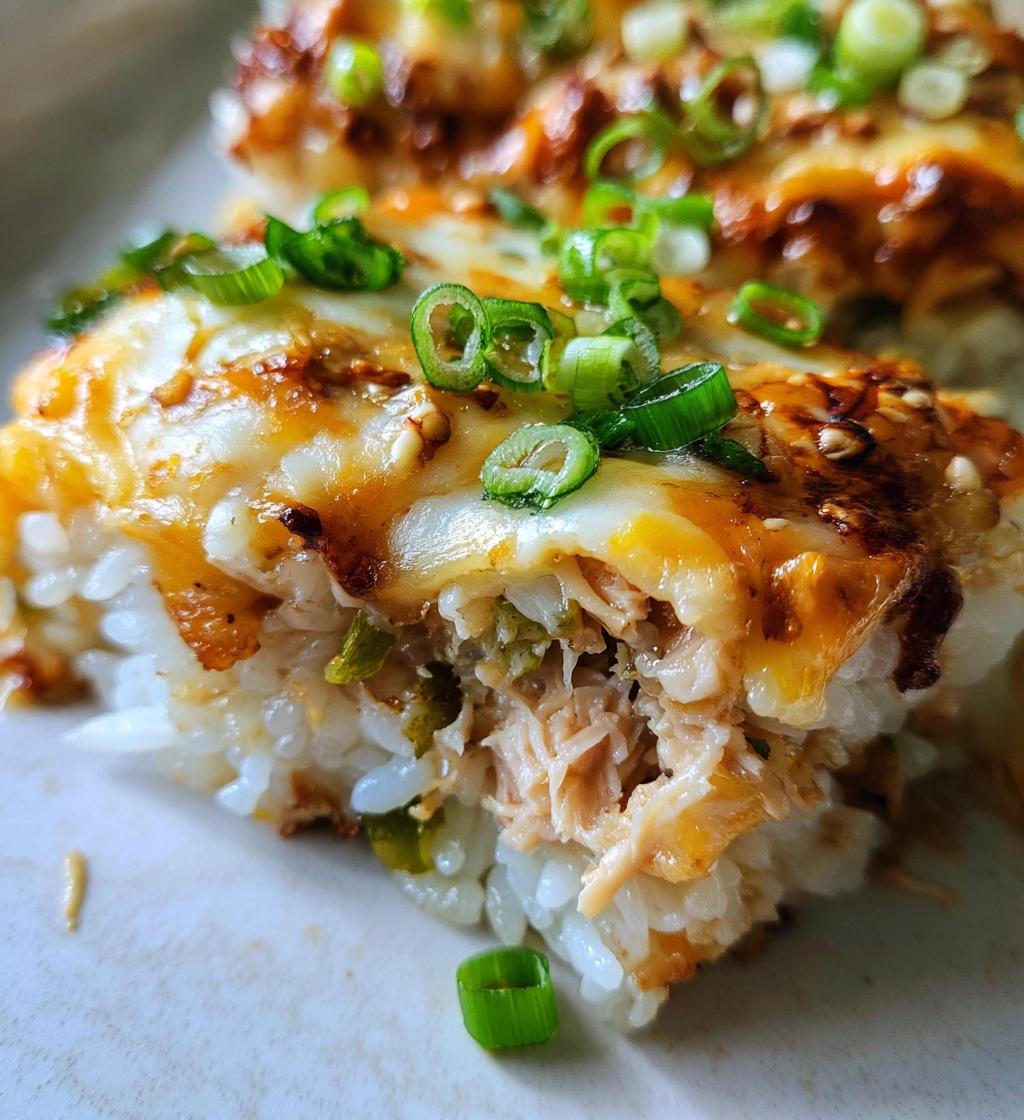
Okay, let’s talk about sushi! It’s one of those foods that makes you feel like you’re treating yourself, right? But what if I told you that you can enjoy all those delicious sushi flavors in a quick and easy baked dish? Enter my tuna sushi bake! This dish takes the classic sushi experience and transforms it into a warm, comforting casserole that’s perfect for a weeknight dinner or a fun gathering with friends.
Imagine tender, fluffy sushi rice mingling with savory tuna, creamy mayonnaise, and a hint of spice from sriracha. Then we add in a sprinkle of green onions for that fresh crunch, and let’s not forget the cheesy goodness that melts on top! This tuna sushi bake packs in all those umami flavors we love from sushi while being incredibly easy to throw together. You don’t even need to roll anything!
Whether you’re a sushi lover or just looking to jazz up your dinner routine, this dish is bound to impress. Trust me, once you try it, you’ll be hooked! So, let’s dive into the magic of making this delightful dish that brings the best of sushi right to your oven.
Ingredients List
Gathering the right ingredients is the first step to creating the most delicious tuna sushi bake. Here’s what you’ll need:
- 2 cups sushi rice: This is the star of the show! Make sure to use sushi rice, as it has the perfect stickiness that brings everything together. Rinse it well until the water runs clear to remove excess starch.
- 2 cups water: You’ll need this for cooking the sushi rice. The ratio is crucial for achieving that fluffy texture we all love.
- 1 can (12 oz) tuna, drained: Look for good-quality tuna packed in water or oil—your choice! Drain it well so it doesn’t make the bake too wet.
- 1/2 cup mayonnaise: This creamy ingredient adds richness and helps bind everything together. I prefer using Japanese mayo for an extra touch of umami, but any kind will work!
- 1/4 cup soy sauce: This brings that savory, salty flavor that’s a must in any sushi dish. You can go for low-sodium soy sauce if you’re watching your salt intake.
- 1 tablespoon sriracha: Want a little kick? This spicy sauce adds just the right amount of heat. Adjust it according to your taste—feel free to add more if you’re a spice lover!
- 1/2 cup green onions, chopped: Freshly chopped green onions add a nice crunch and a burst of flavor that brightens up the dish.
- 1 sheet nori, cut into strips: These seaweed strips will give your bake that authentic sushi vibe. You can adjust the amount based on how much you like that sea flavor!
- 1/2 cup shredded cheese: I love using a blend of mozzarella and cheddar for that gooey, melty topping. It’s the cherry on top of this sushi bake!
With these ingredients on hand, you’re ready to create something magical in the kitchen. Let’s get cooking!
How to Prepare Instructions
Now that you’ve got your ingredients ready, let’s dive into the simple steps to whip up your tuna sushi bake. I promise it’s easier than you think!
- Preheat your oven: First things first, go ahead and preheat your oven to 350°F (175°C). This way, it’s nice and hot when your bake is ready to go in!
- Rinse the rice: Take your sushi rice and place it in a fine-mesh strainer. Rinse it under cold water until the water runs clear. This step is super important because it helps remove excess starch, keeping your rice fluffy and not gummy.
- Cook the rice: Now, in a medium saucepan, combine the rinsed sushi rice with 2 cups of water. Bring it to a boil over medium-high heat, then cover and reduce the heat to low. Let it simmer for about 15 minutes until the water is absorbed and the rice is tender. Once it’s done, remove it from heat and let it sit for another 10 minutes with the lid on—this helps the rice steam and become perfectly fluffy!
- Mix the tuna filling: While the rice is cooking, grab a large mixing bowl. In it, combine the drained tuna, mayonnaise, soy sauce, sriracha, and chopped green onions. Mix everything together until well combined. Trust me, this mixture is where all the flavor magic happens!
- Combine the rice and tuna: Once your rice has rested, fluff it with a fork to separate the grains. Then, gently fold the cooked rice into the tuna mixture until everything is evenly combined. You want to be careful here—no need to mash the rice!
- Spread into a baking dish: Grab a baking dish (about 9×9 inches works great) and lightly grease it if you like. Pour the rice and tuna mixture into the dish, spreading it out evenly. This is where it starts to look like a yumminess-filled casserole!
- Add the toppings: Sprinkle the shredded cheese over the top, and then add those nori strips. You can place them on top however you like—get creative with it!
- Bake it: Slide your dish into the preheated oven and bake for about 20 minutes, or until the cheese is melted and bubbly. The aroma will be absolutely heavenly, and you’ll be counting down the minutes!
Once it’s done, take it out of the oven (don’t forget to use oven mitts—hot, hot, hot!) and let it cool for a few minutes before serving. This way, the flavors can settle a bit, and you won’t burn your tongue on that delicious cheesy goodness!
And there you have it! A delightful tuna sushi bake ready to be devoured. Enjoy!
Nutritional Information Section
Now, let’s chat about the nutritional side of this fabulous tuna sushi bake. While I love to indulge, I also think it’s good to have an idea of what we’re putting into our bodies. Here’s the estimated nutritional breakdown for one serving:
- Calories: 300
- Fat: 15g
- Saturated Fat: 3g
- Unsaturated Fat: 10g
- Trans Fat: 0g
- Cholesterol: 30mg
- Sodium: 600mg
- Carbohydrates: 25g
- Fiber: 1g
- Sugar: 1g
- Protein: 18g
Keep in mind that these values are estimates and can vary based on the specific brands of ingredients you use and any substitutions you might make. But overall, this dish offers a nice balance of protein and carbs, making it a filling option for dinner. So, dig in and enjoy the deliciousness without any guilt!
Why You’ll Love This Recipe
- Quick and Easy: This tuna sushi bake comes together in just about 40 minutes, making it perfect for busy weeknights when you want something delicious without spending hours in the kitchen.
- Deliciously Comforting: With its warm, cheesy topping and savory tuna filling, every bite offers that satisfying comfort food experience we all crave.
- Unique Twist on Sushi: If you love sushi but want a fun and different way to enjoy it, this baked dish brings all those classic flavors together in a cozy casserole form!
- Customizable: You can easily adjust the spice level or swap out ingredients based on what you have on hand. Feel free to experiment with different proteins or toppings!
- Great for Sharing: This recipe yields about six servings, making it a fantastic choice for gatherings, potlucks, or family dinners. Everyone will be asking for seconds!
- Kid-Friendly: The cheesy, baked nature of this dish is often a hit with kids, making it a sneaky way to introduce them to the flavors of sushi!
Tips for Success
To make sure your tuna sushi bake turns out absolutely perfect, I’ve got some tried-and-true tips that I’ve learned along the way. Trust me, these little nuggets of wisdom will elevate your dish to the next level!
Perfectly Cooked Rice
The key to a fantastic sushi bake is all in the rice. When cooking your sushi rice, make sure you’re using the right water-to-rice ratio—2 cups of water for every 2 cups of rice is spot on. After bringing it to a boil, don’t skip the steaming step! Let it sit covered for 10 minutes after cooking to ensure every grain is fluffy and tender. This is non-negotiable for that dreamy texture!
Adjusting Spice Levels
If you love a little heat, feel free to ramp up the sriracha! Start with the suggested tablespoon, but if you’re feeling adventurous, go ahead and add more. Just remember, you can always add more spice, but you can’t take it away once it’s in there! If you’re unsure, taste the mixture before combining it with the rice—this way, you can find that perfect balance.
Mixing Gently
When combining the rice and tuna mixtures, use a gentle touch. You want to fold them together without smashing the rice. This keeps the fluffy texture intact and ensures every bite has a delightful balance of flavors.
Cheese Choices
For that melty goodness, pick a cheese that melts well—mozzarella is fantastic, but feel free to mix in some cheddar for a bit more depth of flavor. If you want to switch it up, try a pepper jack for an extra kick!
Let It Rest
Once your tuna sushi bake comes out of the oven, don’t rush to dig in! Letting it rest for about 5-10 minutes allows the flavors to meld and makes serving much easier. Plus, you won’t burn your tongue on that deliciously gooey cheese!
With these tips, you’re all set to create a tuna sushi bake that’ll have everyone raving about your cooking skills. Enjoy the process, and happy baking!
Variations
The beauty of the tuna sushi bake lies in its versatility! While the classic version is a hit, there are so many exciting ways to switch things up and make it your own. Here are some delicious variations to consider:
- Different Proteins: If you’re not a tuna fan (or just want to try something new), canned salmon works wonderfully in this recipe. You could also use cooked shrimp or even shredded chicken for a different flavor profile. The key is to keep the protein moist, so it combines well with the other ingredients.
- Herb Infusions: Add a pop of freshness by incorporating herbs like cilantro or basil into the tuna mixture. These flavors can brighten up the dish and give it a unique twist. Just chop them finely and mix them in along with the green onions!
- Cheese Variety: While I adore the mozzarella and cheddar combo, feel free to experiment with different cheeses! Cream cheese can add a rich, creamy texture, while pepper jack introduces an exciting kick. You could even try a blend of cheeses like gouda or feta for something extra special.
- Adding Veggies: For a heartier bake, throw in some finely chopped bell peppers, mushrooms, or even spinach. Just sauté them lightly before mixing them in to ensure they’re tender and flavorful. This not only boosts the nutrition but also adds some lovely color to your dish!
- Spice It Up: If you like things spicy, consider mixing in some chopped jalapeños or using a spicier mayo. You can also sprinkle some chili flakes on top before baking for an extra layer of heat!
- Switching Up the Base: Instead of sushi rice, you could use quinoa or brown rice for a different texture and flavor. These alternatives can add more fiber and nutrients while still working beautifully in this bake.
These variations can turn your tuna sushi bake into a personalized masterpiece that reflects your taste preferences. Have fun experimenting and discovering your favorite combination!
Serving Suggestions
Now that your tuna sushi bake is ready to shine, let’s talk about what to serve alongside it to elevate your meal even further. Trust me, these accompaniments will complement the flavors beautifully!
- Pickled Ginger: This tangy and slightly sweet condiment is a classic sushi companion. It cleanses your palate and adds a refreshing contrast to the rich flavors of the bake.
- Wasabi: If you enjoy a little heat, a dollop of wasabi can take your dish to the next level! Just be careful—this stuff packs a punch, so add it to your taste!
- Fresh Salad: A light, crisp salad with mixed greens, cucumbers, and a simple vinaigrette is a perfect way to balance out the richness of the bake. It adds a refreshing crunch that’s super satisfying.
- Edamame: Lightly salted and served warm, edamame is a fun finger food that pairs wonderfully with the flavors of sushi. It’s also a great source of protein!
- Seaweed Salad: This savory and slightly sweet salad is a fantastic addition that brings more of that sushi vibe to your meal. Plus, it’s packed with nutrients!
- Chilled Sake or Green Tea: To drink, consider serving a chilled glass of sake or a refreshing cup of green tea. Both beverages are traditional in Japanese cuisine and will beautifully accompany your meal.
With these serving suggestions, your tuna sushi bake will not only be delicious on its own but also create a delightful and well-rounded dining experience. Enjoy every bite!
Storage & Reheating Instructions
Alright, so you’ve enjoyed your tuna sushi bake, but what about those delicious leftovers? Don’t worry, I’ve got you covered! Proper storage and reheating will keep that yummy goodness tasting just as fantastic as when it first came out of the oven.
Storing Leftovers: Once your bake has cooled down a bit, transfer any leftovers into an airtight container. If you’ve got a lot, you can cut it into portions to make it easier to grab and go. Make sure to seal it tightly to keep it fresh. You can store it in the refrigerator for up to 3-4 days. If you want to keep it longer, consider freezing it!
Freezing: To freeze your tuna sushi bake, let it cool completely before wrapping it tightly in plastic wrap and then in aluminum foil (or use a freezer-safe container). This will help prevent freezer burn. You can freeze it for up to 2-3 months. Just remember to label and date it so you know what you’ve got on hand!
Reheating: When it’s time to enjoy those leftovers, I recommend reheating in the oven to maintain that lovely texture. Preheat your oven to 350°F (175°C). If it was frozen, let it thaw in the fridge overnight first. Place the leftover bake in an oven-safe dish, and cover it with foil to keep it from drying out. Heat for about 15-20 minutes, or until it’s warmed through and the cheese is melty again.
If you’re in a hurry, you can also reheat individual portions in the microwave. Just pop it in for about 1-2 minutes, checking and stirring halfway to make sure it heats evenly. But be careful, it can get hot quickly!
With these simple storage and reheating tips, you can enjoy your tuna sushi bake again and again without losing any of that delicious flavor. Happy munching!
FAQ Section
Got questions about the tuna sushi bake? You’re not alone! Here are some common queries that might pop up while you’re whipping up this delicious dish. Let’s dive in!
Can I use fresh tuna instead of canned?
Absolutely! If you prefer fresh tuna, just make sure to cook it first. You can sear it lightly, then chop it up and mix it into the filling. Fresh tuna adds a lovely flavor and texture to the bake!
What if I don’t have sushi rice?
No worries! While sushi rice is ideal for that sticky texture, you can substitute it with short-grain rice or even jasmine rice in a pinch. Just remember to adjust the water-to-rice ratio accordingly based on the type you use!
Is this recipe gluten-free?
Yes! This tuna sushi bake can easily be made gluten-free. Just use gluten-free soy sauce, and you’re good to go! Always check the labels to ensure all your ingredients are safe.
Can I make this ahead of time?
You sure can! You can prepare the entire bake up to the point of baking. Just cover it tightly and refrigerate it. When you’re ready to enjoy, pop it in the oven straight from the fridge, adding a few extra minutes to the baking time.
How can I make it vegetarian?
If you want to make a vegetarian version, simply swap out the tuna for some cooked mushrooms, tofu, or even chickpeas. Just make sure to season them well to keep that umami flavor intact!
What’s the best way to serve leftovers?
Leftovers are fantastic! Just reheat them in the oven for the best texture. If you’re in a hurry, the microwave works too. Serve with a fresh salad or some pickled ginger for that sushi vibe!
Hopefully, these answers clear up any concerns you might have about the tuna sushi bake. If you have more questions, feel free to reach out! Happy baking!
Print
Tuna Sushi Bake: 7 Comforting Reasons You’ll Love It
- Total Time: 40 minutes
- Yield: 6 servings 1x
- Diet: Gluten Free
Description
A delicious baked dish combining tuna and sushi flavors.
Ingredients
- 2 cups sushi rice
- 2 cups water
- 1 can (12 oz) tuna, drained
- 1/2 cup mayonnaise
- 1/4 cup soy sauce
- 1 tablespoon sriracha
- 1/2 cup green onions, chopped
- 1 sheet nori, cut into strips
- 1/2 cup shredded cheese
Instructions
- Preheat oven to 350°F (175°C).
- Rinse sushi rice until water runs clear.
- Cook rice with water according to package instructions.
- In a bowl, mix tuna, mayonnaise, soy sauce, sriracha, and green onions.
- Combine cooked rice with tuna mixture.
- Spread mixture in a baking dish.
- Top with cheese and nori strips.
- Bake for 20 minutes until cheese is melted.
Notes
- Serve with pickled ginger and wasabi.
- Can substitute canned salmon for tuna.
- Adjust sriracha for desired spice level.
- Prep Time: 20 minutes
- Cook Time: 20 minutes
- Category: Main Dish
- Method: Baking
- Cuisine: Japanese
Nutrition
- Serving Size: 1 serving
- Calories: 300
- Sugar: 1g
- Sodium: 600mg
- Fat: 15g
- Saturated Fat: 3g
- Unsaturated Fat: 10g
- Trans Fat: 0g
- Carbohydrates: 25g
- Fiber: 1g
- Protein: 18g
- Cholesterol: 30mg
Keywords: tuna sushi bake